Share
Pin
Tweet
Send
Share
Send
Very often, microwaves fail and are thrown into the trash. I recently broke another one and I decided to give a second life to its transformer.
The transformer there is step-up and usually converts 220 V to a high voltage of 2000-2500 V, necessary to excite the magnetron.
I saw how many people remake these transformers either as a resistance welding machine or an arc welding machine. But I never saw that they made powerful power supplies from it.
After all, the transformer is very powerful, about 900 watts, and this is not enough. In general, I will show you how to rewind the transformer to the voltage you need.
We disassemble the transformer from the microwave
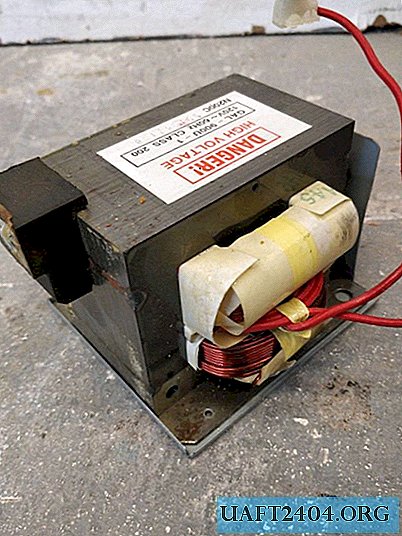
Typically, a microwave transformer contains three windings. The most numerous, wound with the thinnest wire is a step-up, secondary, at the output of which 2000-2500 V. We do not need it, we will remove it. The second winding, thicker, with less wire compared to the secondary is a 220 V network winding. Still, between these two massive windings, there is the smallest one, which consists of several turns of wire. This is a low-voltage winding of about 6-15 V, an outstanding voltage to the magnetron glow.
Cut the seams of the magnetic circuit

It is necessary to cut down the seams that hold together the "W" -shaped plates and the "I" -shaped ones. The seams of the Chinese manufacturer are as strong as they seem. You can cut them with a grinder or even split them with a chisel and hammers. I used a grinder, this is a humane way.
Remove the coils


We remove all the coils. If they are very firmly stuck - tap gently with a rubber mallet. We only need a winding for 220 V, we remove the rest. We put the primary winding back to 220 V and put it down the "Ш" -shaped core.

Secondary winding calculation
Now we need to calculate the number of turns of the secondary winding. To do this, you need to know the transformation ratio. Usually, in such transformers it is equal to unity, therefore one turn of the wire will produce one volt. But this is not always the case and you need to double-check it.
We take any wire and wind 10 turns of wire on the core. Then we collect the core and clamp it with a clamp so that it does not fall apart. Be sure to supply 220 V to the primary winding through the fuse. At this time, we measure the voltage at the output of a 10-turn winding. In theory, it should be 10 V. If not, then the transformation coefficient is not the same as usual and you need to make calculations to calculate the voltage for your winding. All this is not difficult, mathematics is fifth grade.
I have two transformers available. I will do one at 500 V, the other at 36 V. You can do it for any other voltage.
500 V transformer coil winding
The transformation ratio of my instance is one to one. And to wind the winding at 500 V, I need to make 500 turns of wire on the coil, respectively. Take the wire.

Of course not like that, but wound on a drum. We estimate the current strength and the volume of the coil. From these values, select the diameter of the wire.

Here is such a simple device I gathered for winding a coil. The core itself is made of wood, the sides are made of plexiglass. You can fix it on a drill or screwdriver.

Winded, assembled, connected. I measure the output voltage, I almost got it - 513 V, which is acceptable for me.

36 V transformer
The 36 V winding can also be wound manually by taking the appropriate wire. To put on and straighten the winding on the core, you can use such wedges, see photo.

After the whole winding is stretched, into the holes formed, after removing the wedges, put tightly pressed paper. This is my primitive way. Then I recommend impregnating the winding with epoxy, otherwise it will be very buzzing.
Error handling
I rewound the winding to make it denser and more powerful. To do this, I wound it with a double wire, instead of one thick one. In the end I will connect them.

After all the windings are fixed, it is time to assemble the transformer core. To do this, we fix the entire structure with a clamp and arc weld the same places as before. There is no need to make a thick seam, everything should look as it was.
Next, for my rectifier I will need:
- Diode bridge
- Power Capacitor

I will load the rectifier by 20 A, of course the diode bridge must be installed on the radiator.
Also, if you will use a metal case like me, then do not forget to ground it.
About security
Be careful when connecting the transformer, never rush and double check everything. Only connect the transformer through a fuse to avoid a possible short circuit. Do not touch live parts while the transformer is in operation.
Also, when processing metal, be sure to be careful and use eye protection.
Remember that all actions you do at your own peril and risk!
All the best!
Original article in English
Share
Pin
Tweet
Send
Share
Send

