Share
Pin
Tweet
Send
Share
Send
Of course, many will say that at the break you can simply twist the two bare (and de-energized!) Ends of the wire with an ordinary twist, properly tin this twist with tin and wrap it with electrical tape. But not everywhere we use a soldering iron. For example, if the wires are aluminum. Soldering aluminum wires, of course, is quite realistic, but not by what is usually used when soldering copper. Anyway, soldering aluminum is still a headache ... And it may not always be available, for one reason or another, a soldering iron. Also, the braid has an important role in the strength of a wire or cable. On some of our joints, it will be double - as an additional strengthening of the gap, the inner layer of electrical tape, the outer one of the heat shrink tube. And now I propose to consider several types of reliable twists that will help do without a soldering iron with tin.
Will need
- Clerical knife.
- Pliers.
- Nippers or scissors (depending on the wire).
- Insulating tape.
- Heat shrink tubes (with a diameter for the thickness of each core separately, and for the cable thickness, in general).

Method 1: flexible single copper wire.
Trim the wire ends with wire cutters or scissors. Remove two centimeters of braid from the end of the wire.

Divide the copper hairs in the wire into two halves. This will result in a bifurcated ending.

Repeat the procedure with the second wire. Attach the forked ends to each other and twist them, each branch separately.

Next, pull the wire slightly so that it becomes straight, and twist each branch around the wire in the opposite direction from each other.

Wrap with electrical tape and crimp with heat-shrink tubing.

Method 2: hard single aluminum wire.
This method of twisting for aluminum wiring of a small section is the most tensile. Moreover, not so time consuming. Prepare the wiring. For example, I took segments - with long wires it is not easy to control in front of the camera ... But the process is not too different, as you know, the only difference is that, in real work, you have to stand on a stepladder or chair ... So, we clean the core from the braid by 3 -4 cm

We retreat from the edge of the braid about 6-7 mm. and bend the remains of the wire at an angle of 90 degrees.

We apply the bent ends of the wire to each other, like this:

We wind the bent ends of the wire onto the wire of the opposite wire.

We help ourselves with pliers, since it is very problematic to bend the end of a hard wire with our fingers. At the end, we isolate the insulating tape, and sit on top of the insulating tape shrink tube.


Done. And sooner (with excessive tension) the wire will tear in another place than this twist will creep.
Method 3: flexible two-wire copper wire.
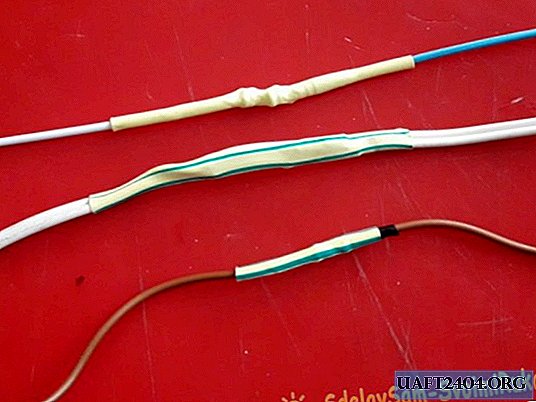
In fact, there is nothing complicated either. First, divide the double wire into separate two cores. Ten centimeters on top. Then we strip the wires by 3 cm and immediately put on them shrink tubes, so as not to forget to do it later, otherwise, you will have to disassemble the twist back to fix this omission.


We repeat the above procedure with the second wire and immediately put on it another heat shrink tube, a little larger diameter, for the general insulation of both wires.

Next, we twist the bare ends, as follows: we apply wires to each other so that between the edges of the braids there is a distance of about a centimeter and a half. We wind the end of one wire onto the base of the other. Then, in the same way, the second wire. You get such a twist.

If in the description and in the photo it is not very clear how more specifically the twisting is done: in the video, at the end of the article, everything is quite clearly visible and understandable. Now we move the heat-shrink tubes pre-prepared on the wires to the twists themselves, and we seat them with a lighter.


Next, we move the common tube to the place of twisting and also seat it with a lighter. In addition to strengthening the braid, the heat shrink tube also performs some aesthetic function, it looks any better than the wound electrical tape.

Here's a twist. Strong and reliable, and most importantly - safe.

When working with electrical appliances and wiring, do not forget about safety measures. Use tools with undisturbed insulation and do not forget to disconnect the repaired object from the mains. Remember that the effect of electric current on the body is dangerous to health.
Watch the video tutorial
Share
Pin
Tweet
Send
Share
Send